Welcome to the new face of Online Booking! With Demandforce’s Online Booking system, your business is able to customize and improve the accuracy of the entire booking experience from the time your clients click to request an appointment to placing the booking in the management system. Thanks to the multitude of ways your office can customize the booking experience, our system produces a more accurate and efficient appointment booking workflow for both your business & its patrons. With Online Booking your office can design & manage:
- New & existing client request options
- Recall appointment request options
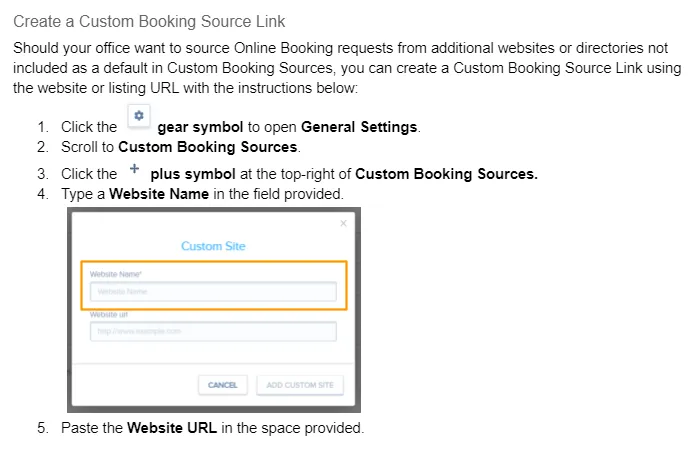
- Multiple reasons for appointment bookings
- Calendar blocks & general booking restrictions
- Provider-based booking profiles & configurations
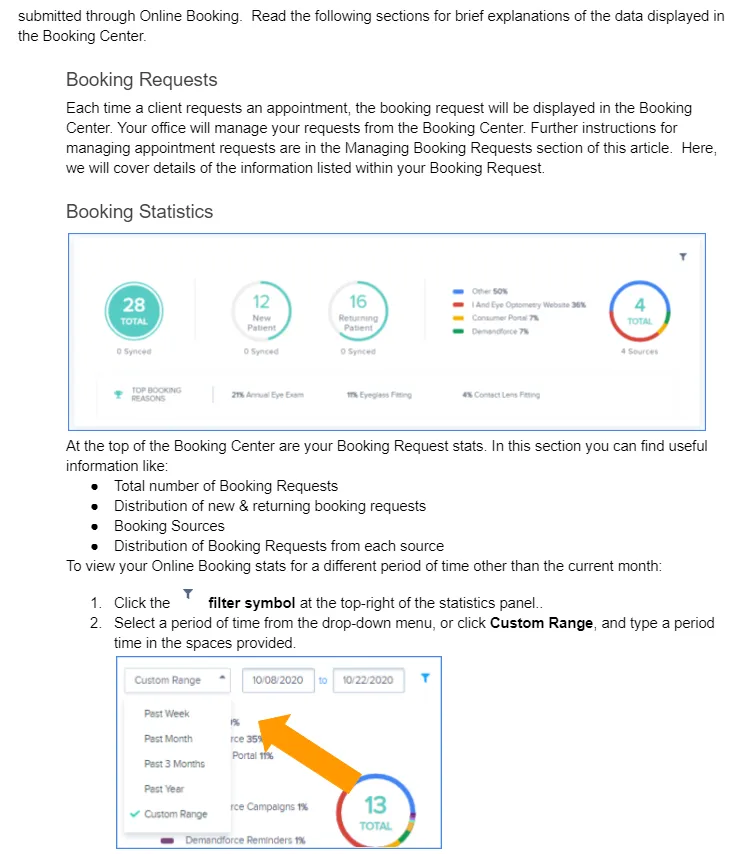
With Online Booking, your business also has access to rich & insightful booking information with the Demandforce Online Booking Center to help you understand:
- Most popular Booking Request sources
- Total New Client Booking Requests
- Total Returning Client Booking Requests
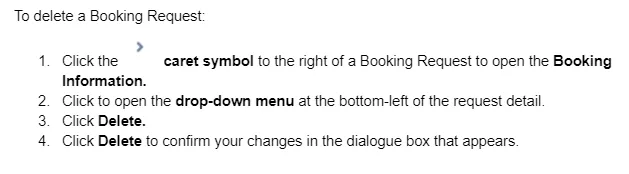
From the Booking Center, your office can also:
- Manage Booking Requests
- View Booking Request details
In the following sections, you will find instructions on configuring your Online Booking settings for the following components:
- Booking Reasons
- Provider-Level Settings
- General Online Booking Settings
In the final sections of this article you will find instructions on managing appointment requests that populate in the Booking Center and the Booking Request statistics that can be viewed from this page.
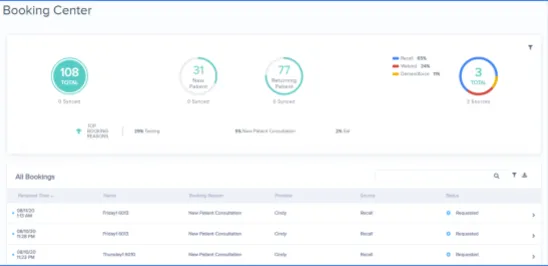
Online Booking allows your existing & prospective clients to request appointments displayed on a calendar of available appointments. The calendar of available appointments is produced from a combination of synced management system appointment data and settings configured within the portal.
With the additions of synced appointment data & Online Booking Settings the resulting appointment requests are much more accurate & easily managed, meaning less time for your office to handle requests. Depending upon how closely your management system works with Online Booking, our system could reduce the guesswork in filling appointment requests, offering a fulfillable request each time.

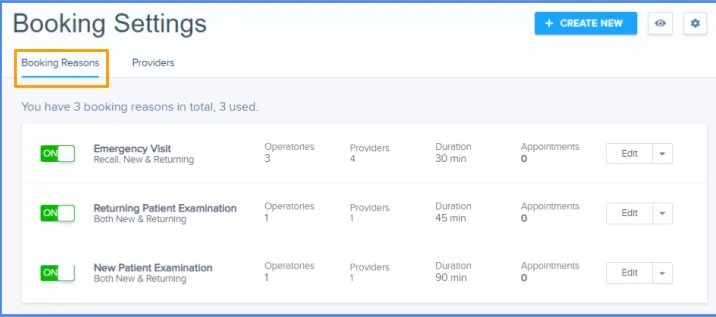
Online Booking has 3 main Settings to control the accuracy of the Booking request process for your clients; these include:
- General Settings
- Booking Reasons
- Providers
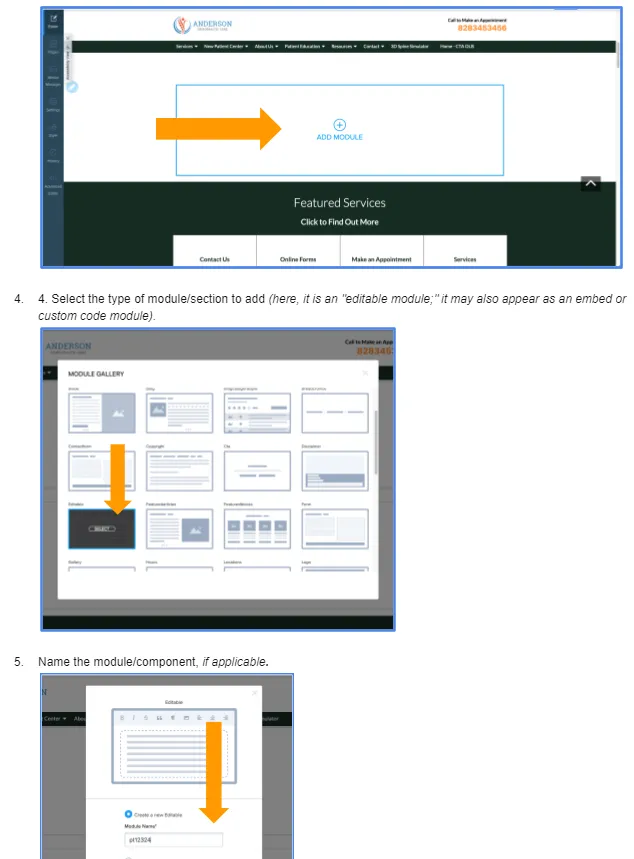
In the following sections of this article, you will find instructions for navigating these settings to configure Online Booking. The changes that you make within these settings will be reflected within the Appointment Request interface from which your clients will request a booking (see image at the top of the Appointment Request section in this article).
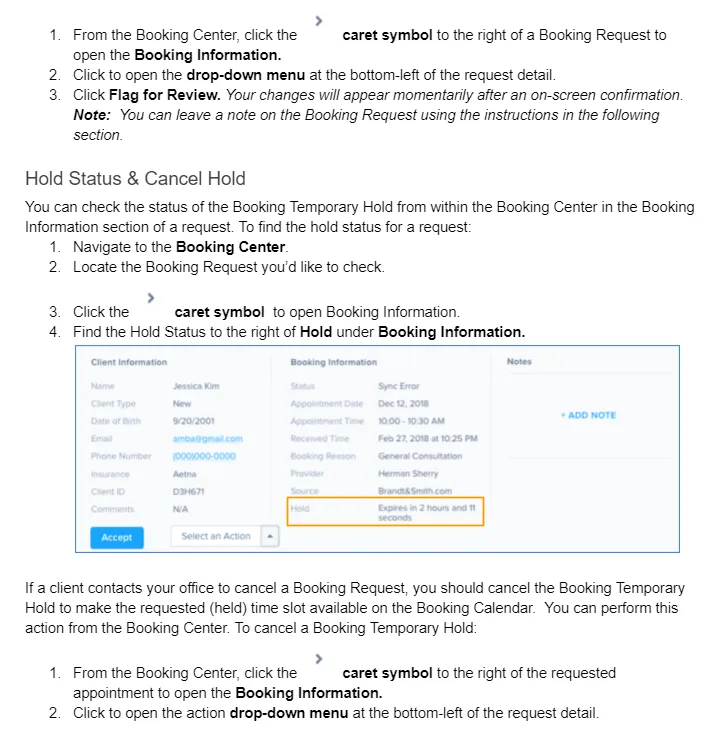
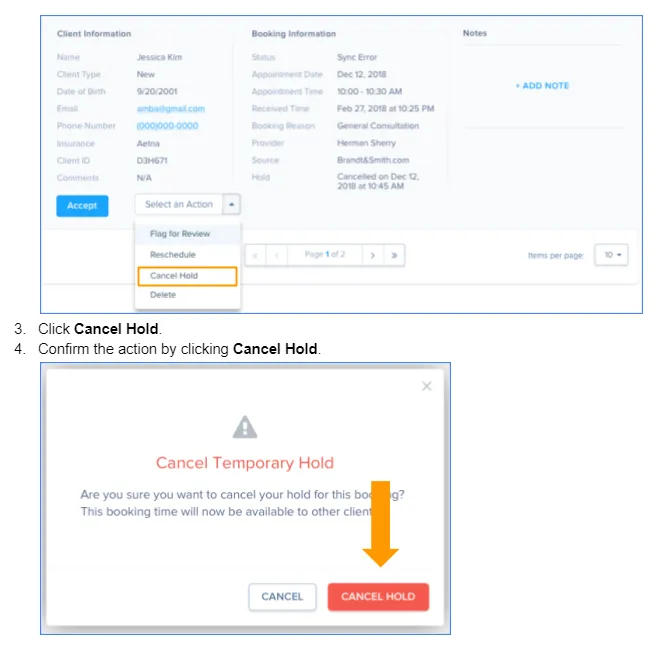
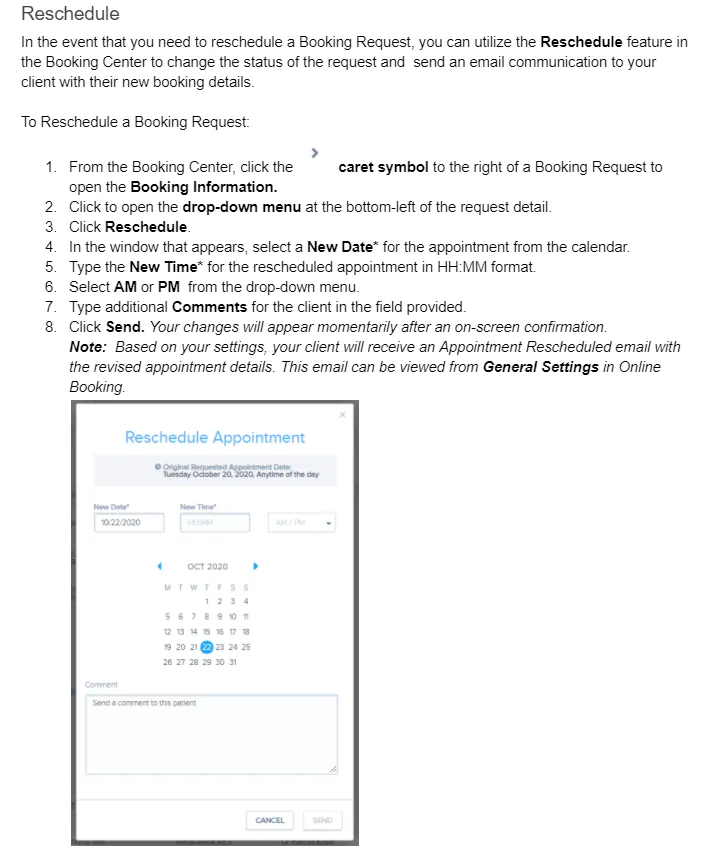
Setup Wizard
If you’d like assistance configuring the Online Booking feature, you can use the Online Booking Setup Wizard in Booking Settings to guide you through creating multiple Booking Reasons at once.
The Online Booking Setup Wizard is designed to take you step-by-step through the creation & configuration of Booking Reasons and highlight a few follow-up tasks that will enhance your office’s use of Online Booking.
Note: For clients new to Online Booking, the Online Booking Setup Wizard will automatically initiate upon accessing Booking Settings the first time. You can access the Setup Wizard in Online Booking Settings at any time in the future from the Booking Reason landing page.
To initiate the Setup Wizard:
- Click Leads on the left-navigation bar.
- Click Online Booking.
- Click Booking Settings.
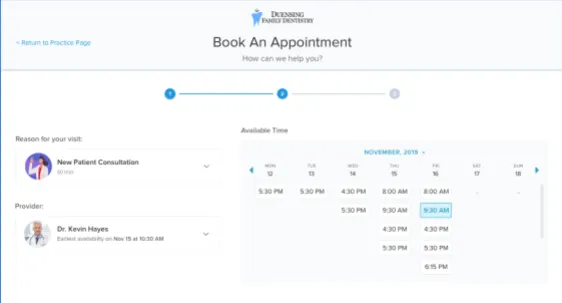
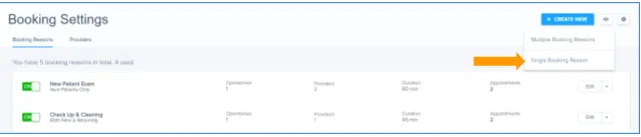
- Click +Create New at the top-right of the Booking Reasons page.

Click Customize to return to Booking Settings and further define each individual Booking Reasons criteria for example:
- Add additional Providers
- Add a custom Schedule of Booking Hours (per Provider)
- Add Special Instructions
- Add Cancellation Policy
For further instruction on completing the individual tasks above, read further through this article. ;
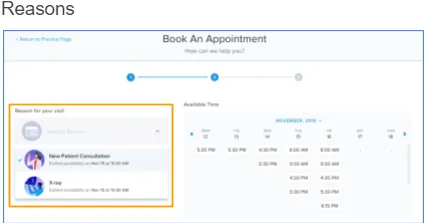
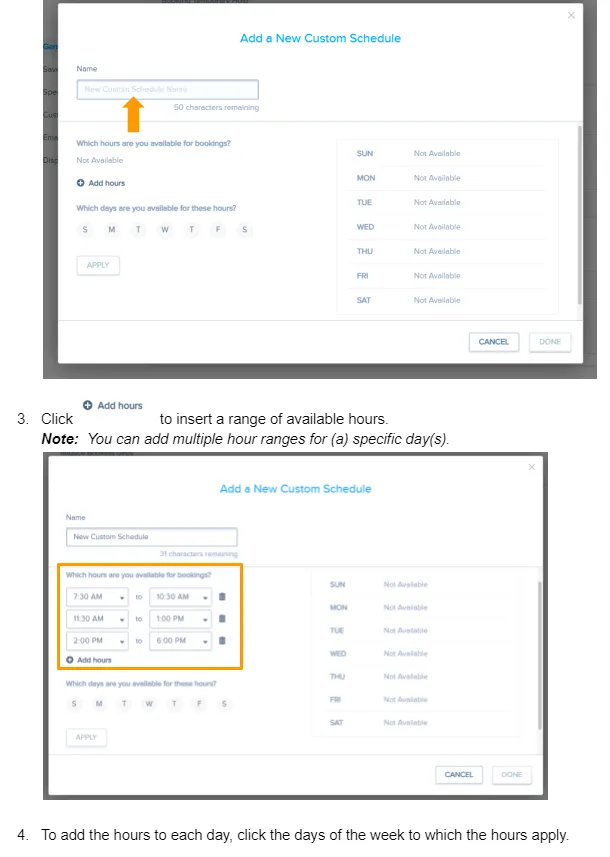
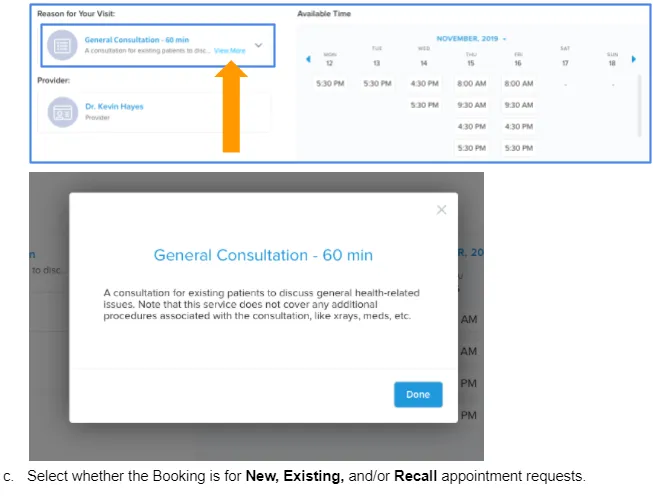
Booking Reasons are the appointment types that your client will select from when they are requesting a booking with your office. Upon selecting whether they are new or returning, it is the first designation that they make in order to begin the request process & reveal open appointment times in your management system.

Create Booking Reasons
- From Booking Reasons, click the +Create New button at the top-right of the page, then click Single Booking Reason.
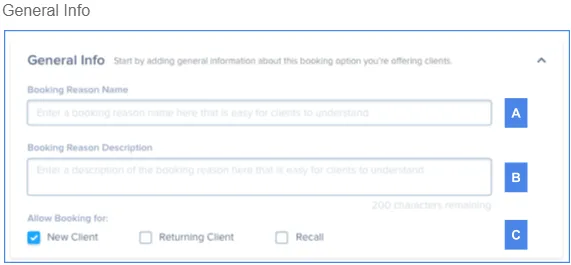
- Type a name for the Booking Reason.
Note: This is the name that will appear to clients & patients when they are requesting an appointment with your office.
- Optional: Type a short description of the Booking Reason.
Note: This is an optional section that will appear on the Online Booking request flow when your clients select a Booking Reason to request.; see the image below.
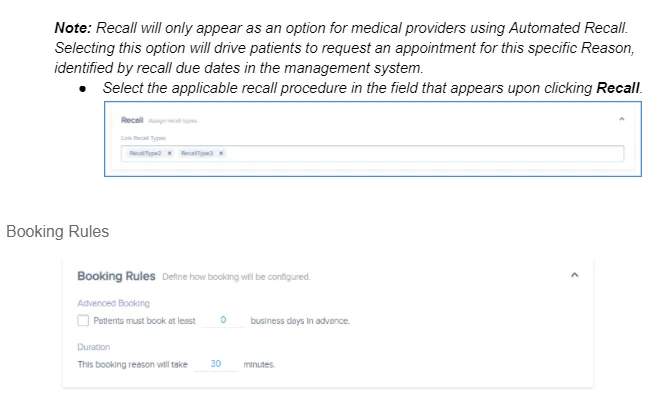
Advanced Booking
In this section, you can configure how many days in advance a booking request must be submitted. When clients request an appointment with your office, the indicated number of business days prior to the appointment will not populate availability. To configure this setting:
- Click the checkbox under Advanced Booking.
- Enter the number of business days in advance an appointment must be requested.
- To save changes & close Booking Reason Settings, click Save.
Note: If your clients do not have to book in-advance, then leave the checkbox unchecked, and continue making edits to the Booking Reason. Click Save at the bottom-right of the page when you’ve completed your work.
Duration
In this section you will configure the amount of time that a Booking Reason should take for the patient/client. This is displayed to the requester upon selecting a Booking Reason for their appointment on the Online Booking request interface.
- Click Edit to the right of a Booking Reason.
- Click the input field under Duration in Booking Rules.
- Type the desired appointment duration in minutes.
- Continue editing the Booking Reason, or click Save to close.
Note: You can adjust the actual (office) time needed for a Booking Reason when you set up the available providers for that Reason; this can include prep/clean-up time for which the patient/client does not need to be present. See Add Resources for additional information.
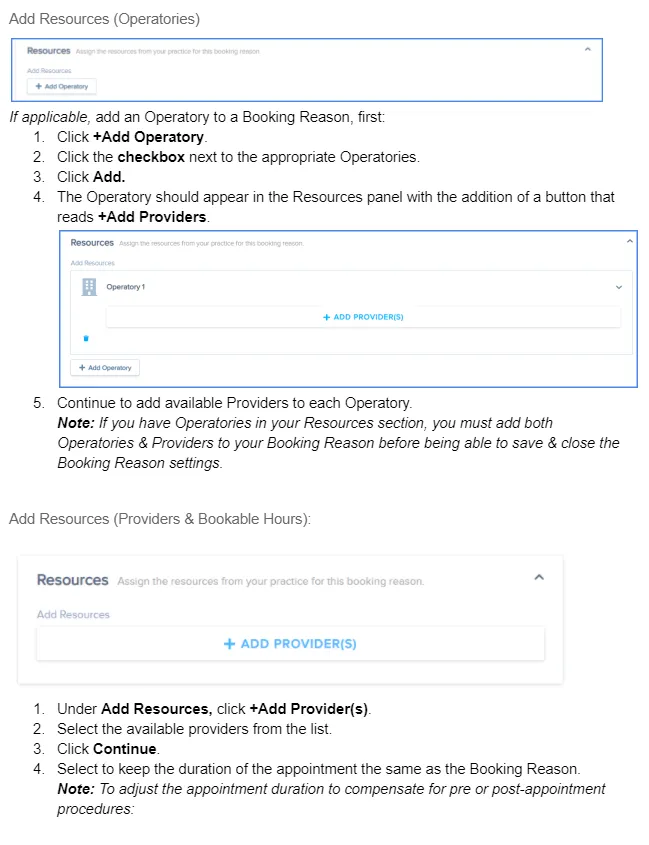
Resources
In the Resources section of a Booking Reason, configure the available operatories (if applicable) & providers for a given Booking Reason. This section allows our system to read your management system’s booked/available appointment data for both of these factors to produce the most accurate request possible.
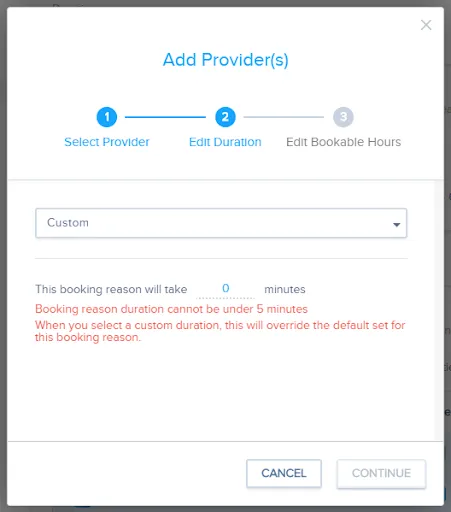
- Click the drop-down menu.
- Click Custom.
- Type the number of minutes in the field provided.
Note: Changing this field will not change the amount of time published on the client/patient’s request; this is a backend setting that will ensure your office has enough time for this booking for additional pre/post-appointment office procedures.
- Click Continue.
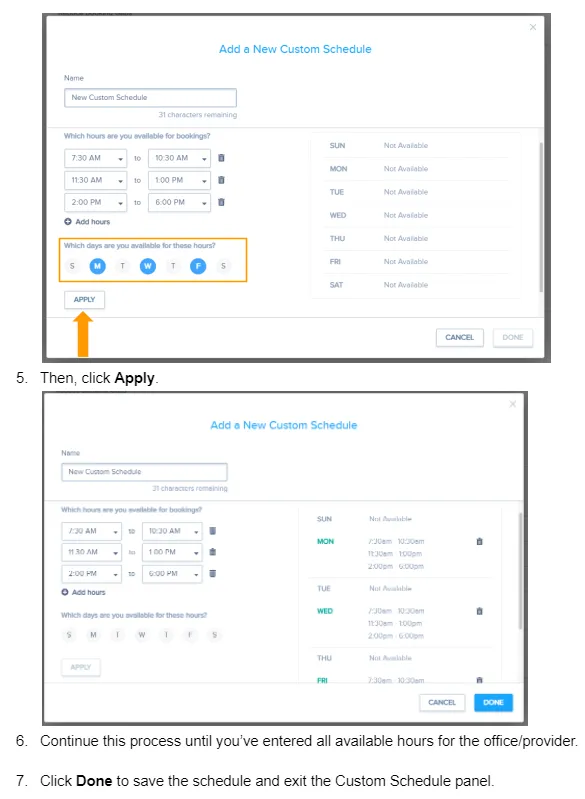
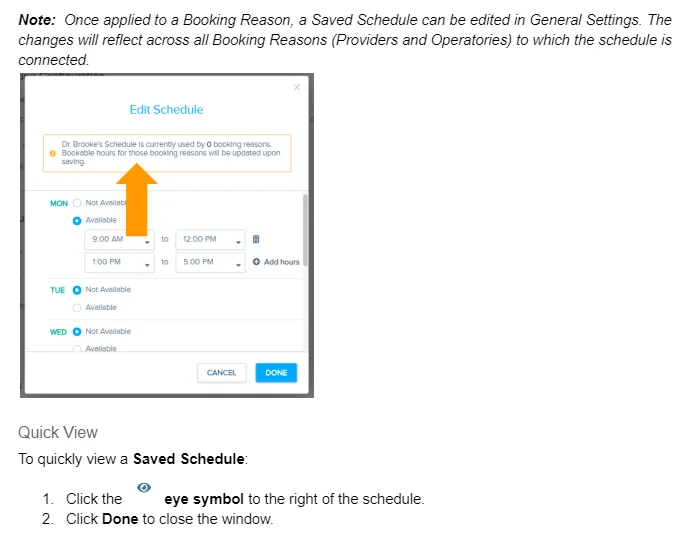
5. Click the drop-down menu, and select a Calendar of Bookable Hours to be applied to the selected Provider(s).
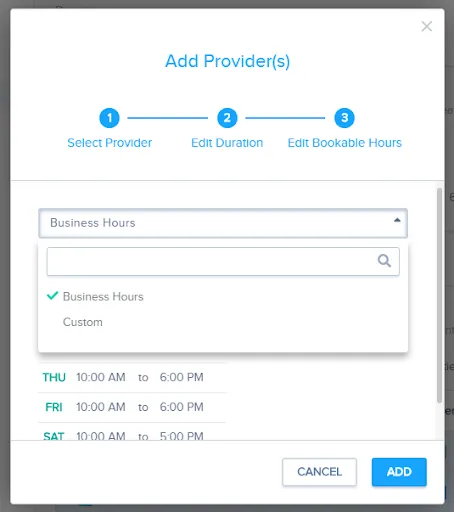
Note: If you’ve previously selected multiple Providers for one Operatory, during this step you will be able to select only one Calendar of Bookable Hours to be applied to all selected Providers.
- If Providers’ schedules vary, click Cancel, and click +Add Providers in order to select only one Provider & apply their specific Calendar of Bookable Hours in this step. Continue this process by clicking +Add Providers under the desired Operatory, and the add remaining Provider(s) to each Operatory, individually attaching their specific Calendar of Bookable Hours, if required.
- Repeat for each Operatories’ available Providers.
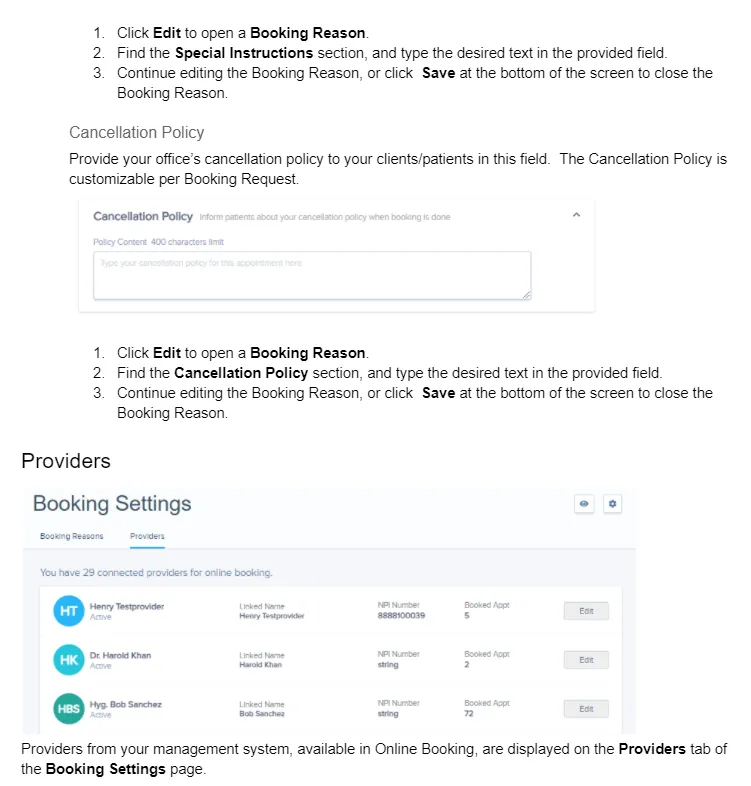
From this page you can:
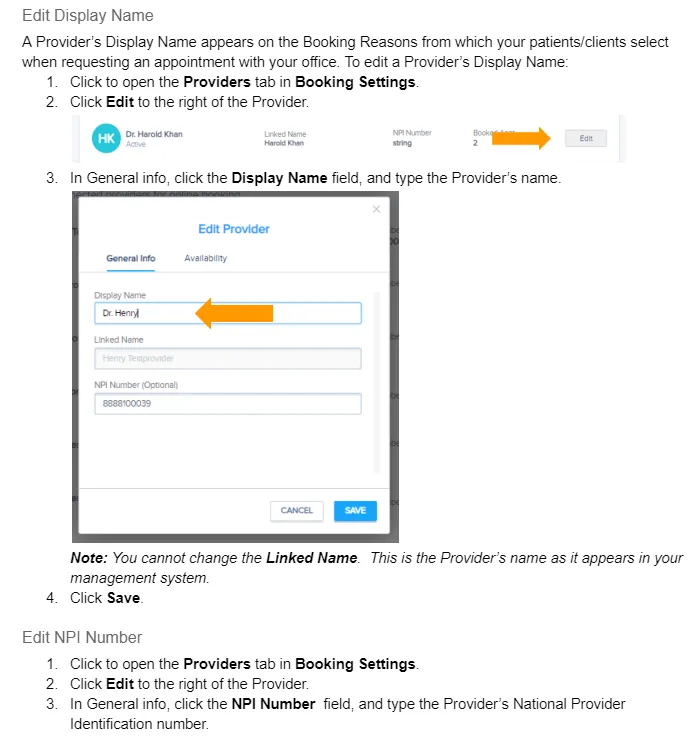
- Edit a Provider’s display name
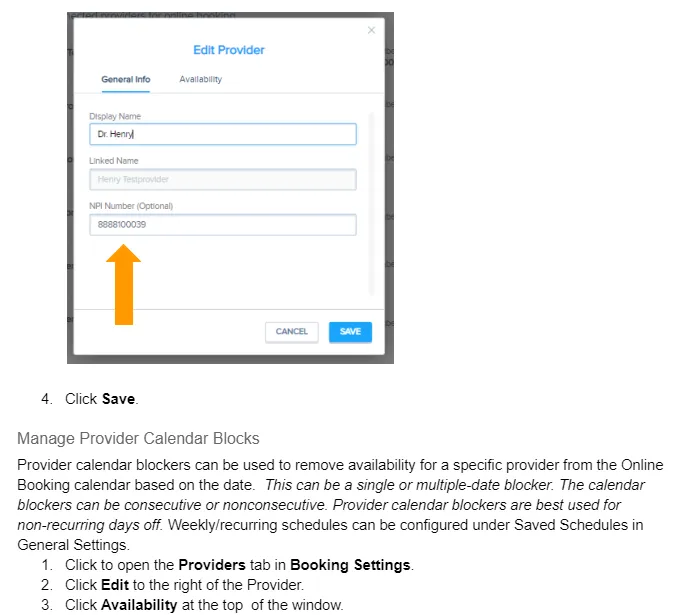
- Add/Edit a Provider’s NPI number
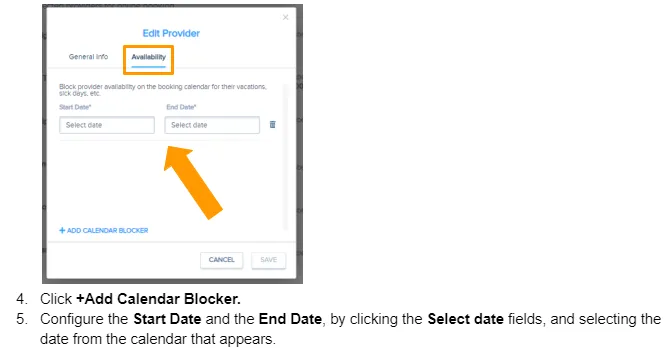
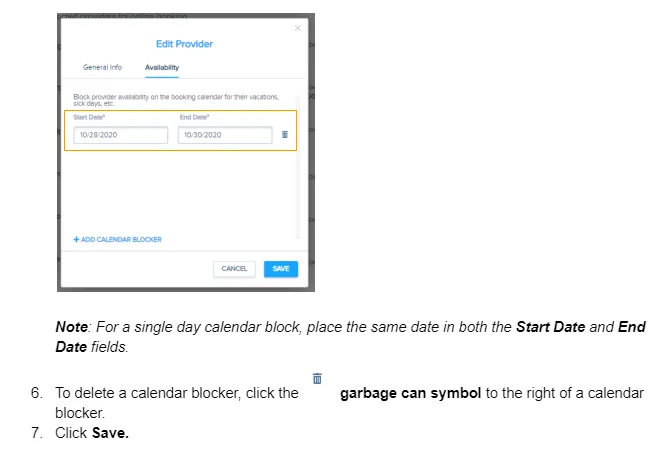
- Create/Edit/Delete a Provider-specific Calendar Block
Instructions for performing each of the listed tasks is included in the sections below.
Note: If a Provider for which your office schedules appointments is not listed on the Providers tab, or if there are inactive/unused Providers listed that you’d like removed, please contact support for assistance.